0330 113 4909
How to fit a stair runner
Fitting a stair runner can seem like a complicated project, however if you have the right guidance it can be very simple. For starters, you'll need to ensure you have picked your stair runner and measured it to suit your personal preference and desired staircase coverage. If you've not already read our How To Measure A Stair Runner guide, we would recommend doing so to identify your start and end points and familiarise yourself with treads, risers and noses as we will be mentioning these within this guide.
Please note that this guide is for the fitting of straight stairs only. For fitting a stair runner on winders, or those with a bend or a half landing and turn, we strongly recommend that you employ the services of a professional fitter.
WHAT YOU'LL NEED:
- Tape measure and marker pen
- Scissors and/or knife
- Hammer and carpet tacks
- Screwdriver
- Heavy duty stapler or double-sided tape
- Gripper Rods
- Hacksaw
GRIPPER RODS
Stair runners are purely decorative and it is essential to fit your stair runner using gripper rods. Gripper rods come in both medium- and short-pin depending on the thickness of the carpet being fitted.
You will need one length of gripper for each riser and one for each tread.
- Cut your gripper lengths so that they are 100mm (4") less than the width of your runner to allow 50mm (2") either side. You'll need to ensure that the gripper will not show at the sides of your runner.
- Attach one piece of gripper to the bottom of each riser, approximately 25mm (1") up from the tread, checking that the pins facing down towards the tread and the gripper is centred, so that it will not stick out at either side of your runner.
- Attach one piece of gripper to the back of each tread, 25mm - 50mm (1"- 2") away from the riser (depending on the thickness of your runner). Make sure that the pins are facing back towards the riser and that the gripper is centred, so that it won't be seen past the sides of your runner.
NB: You will need to fit your first gripper, at the bottom of your stairs when you are ready to fit your runner to allow you to create a neat edge, unless you are using Easy bind.
Once you have attached gripper to every tread and riser to which you will be fitting your runner, you can install your underlay.
UNDERLAY
A good quality underlay will prolong the life of your runner by protecting it from excessive wear on the tread and, particularly, over the nose of the tread. We recommend that you use conventional carpet underlay, which you can purchase from any reputable carpet retailer or DIY store.
To fit underlay for your stair runner:
- Cut a rectangle of underlay 100mm (4") narrower than the width of your runner. It should be long enough to start from the gripper on the tread and run over the nose of the stair and butt up to the gripper on the riser below. Ideally you should taper the underlay underneath the nose, so that it resembles the flap of an envelope.
- The underlay should not sit over the gripper but fit closely to it at each end. Either staple or use double-sided tape to fix the underlay firmly in place.
- Repeat for each stair until complete and you are ready to attach the carpet runner to your stairs.
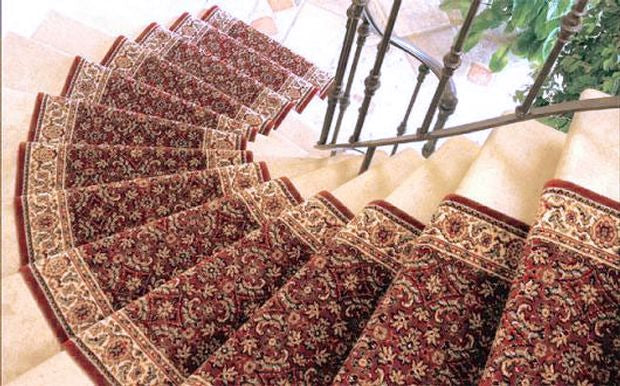
RUNNER
First identify which way the pile of your runner lays smooth by rubbing your hand back and forth across it. Your aim is to lay your runner with the pile running smoothly down the riser. Not only will this look better, but it will mean that your runner also catches less dirt.
To fit your carpet runner, you'll need to follow these steps:
- Starting from the bottom of the stairs, you need to attach the end of your runner underneath the gripper like a hem to create a neat edge. The easiest way to do this is to roll up the excess runner, with the pile to the outside, and place the roll at the bottom of your stairs, with the end facing the stairs. Pull the end up a little and with the pile facing the riser, tack into place about 50mm (2") from the floor. Then attach the gripper to this riser, over this runner "hem".
- Fold the carpet back round the gripper, making sure you now have a neat edge at the floor and press onto the gripper.
- Now work upwards, ensuring the gripper pins are holding the runner securely onto each tread and riser, keeping up an even tension so that your runner does not start to twist as you move up the stairs.
- When you reach the top of your stairs, you will need to fold the runner back under itself to create a neat edge, like a hem and tack into place. Alternatively, you can use Easy bind for an attractive finish to your runner.
- Once you have finished fitting your stair runner, dress down all gripper pins with a hammer so that they do not stick up through the runner.
Fitting your stair runner doesn't have to be a complicated task. Simply follow our instructions and ensure you have the recommended equipment, and you'll soon be as good as the professionals! Here at Stair Rods Direct, we have a fantastic range of runners, rods, underlay, easy bind, and more, to help you complete your DIY project.
Planning some more home improvements? We have plenty of other helpful guides that will assist you. If you have any questions about any of our products, or want to get our opinion on anything, please don't hesitate to contact us.